So yesterday, I got up to here:
C:\Users\Administrator>vagrant up
Bringing machine ‘default’ up with ‘hyperv’ provider…
==> default: Verifying Hyper-V is enabled…
==> default: Importing a Hyper-V instance
default: Cloning virtual hard drive…
default: Creating and registering the VM…
default: Setting VM Integration Services
default: Successfully imported a VM with name: VMWinServer2016c
==> default: Starting the machine…
==> default: Waiting for the machine to report its IP address…
default: Timeout: 120 seconds
default: IP: fe80::75db:68b5:4938:3755
==> default: Waiting for machine to boot. This may take a few minutes…
default: SSH address: 169.254.55.85:22
default: SSH username: vagrant
default: SSH auth method: private key
Timed out while waiting for the machine to boot. This means that
Vagrant was unable to communicate with the guest machine within
the configured (“config.vm.boot_timeout” value) time period.
If you look above, you should be able to see the error(s) that
Vagrant had when attempting to connect to the machine. These errors
are usually good hints as to what may be wrong.
If you’re using a custom box, make sure that networking is properly
working and you’re able to connect to the machine. It is a common
problem that networking isn’t setup properly in these boxes.
Verify that authentication configurations are also setup properly,
as well.
If the box appears to be booting properly, you may want to increase
the timeout (“config.vm.boot_timeout”) value.
Which is basically where I have created a base box, and am testing it using vagrant up to see if it works correctly or not. It is throwing an error at the ssh authentication point, and timing out. The GUI works, but for some reason it does not continue. I have searched for possible error solutions on forums. I will start by increasing the timeout value (
on the host, add the following to the Vagrantfile
config.vm.boot_timeout = 600) from this forum.
Then I will have to try the other recommended approach of altering the eth settings. They are also described in this forum, and this forum. I have updated the timeout to 600 secs – no change, I still get the same timeout error. I can log in and use the virtual machine itself, but for some reason it will not progress past that point through the command vagrant up.
Tried this, from here:
A simple breakthrough here: the default Vagrantfile didn’t include a mapping of a port from the host machine to 22 on the guest and it occurred to me that maybe the default mapping of port 2222 (host) to 22 (guest) wasn’t being honored. I put the following line in to make the mapping explicit, and the key-based SSH authentication has now started working:
config.vm.network "forwarded_port", guest: 22, host: 2222, host_ip: "127.0.0.1", id: 'ssh'
This was unsuccessful. I went to this blog and tried their advice from Solution 4, to disable the IPv6 settings on the virtual switch. No dice, still the same error.
I tried changing the settings of the network adaptor in Hyper-V to check the box next to enable virtual LAN identification. This meant the VM could no longer access the internet. I changed it back to unselected. Can now access internet again. Dead end.
I enabled the debugging log as per Vagrant page, to try to get more info on what was causing the issue. Did not lead to anything substantial, after searching forums for the errors shown.
I tried changing/overwriting the insecure_private_key file (to vagrant), as shown on this forum. No result – still times out at the same point. Tried this, from the same forum:
In other cases, it is helpful to just set forward_agent in Vagrantfile:
Vagrant::Config.run do |config|
   config.ssh.forward_agent = true
end
Still no joy. Next I tried checking the running processes as suggested here. Nothing came up in response to the command.
I then tried to use WinRM rather than ssh, as I was starting to lose patience with ssh:
# winrm config, uses default user/password. If other credentials are used must be changed here
config.vm.communicator = “winrm”
config.winrm.username = “vagrant”
config.winrm.password = “vagrant”
I updated the above info into the vagrantfile, and then tried vagrant up again, using information from here. This seemed to work!
C:\Users\Administrator>vagrant up
Bringing machine ‘default’ up with ‘hyperv’ provider…
==> default: Verifying Hyper-V is enabled…
==> default: Starting the machine…
==> default: Waiting for the machine to report its IP address…
default: Timeout: 120 seconds
default: IP: 172.16.1.104
==> default: Waiting for machine to boot. This may take a few minutes…
default: WinRM address: 172.16.1.104:5985
default: WinRM username: vagrant
default: WinRM execution_time_limit: PT2H
default: WinRM transport: negotiate
==> default: Machine booted and ready!
==> default: Preparing SMB shared folders…
default: You will be asked for the username and password to use for the SMB
default: folders shortly. Please use the proper username/password of your
default: Windows account.
default:
default: Username: vagrant
default: Password (will be hidden):
==> default: Mounting SMB shared folders…
default: C:/Users/Administrator => /vagrant
==> default: Machine already provisioned. Run `vagrant provision` or use the `–provision`
==> default: flag to force provisioning. Provisioners marked to run always will still run.
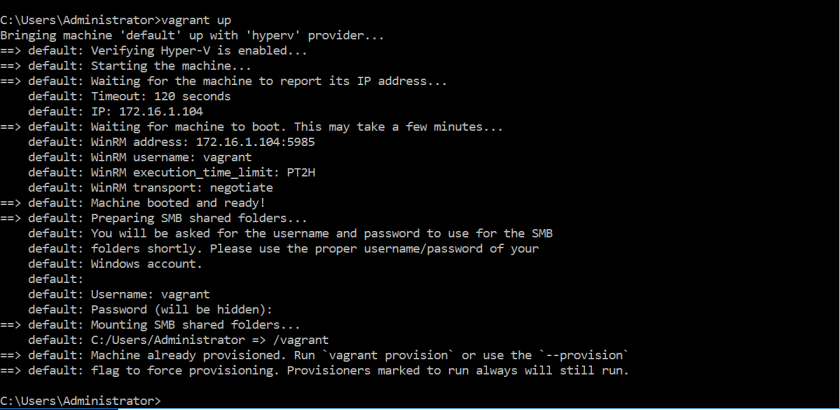
Woo. So I just wasted a lot of time trying to do the wrong thing, but at least, now I know. It was clearly stated here on the Vagrant site, but I had overlooked it, sadly.
Out of interest, I tried removing the username and password portions, and it made no real difference to boot up, so this is good. I have now left them out (and emailed myself a copy of the successful vagrant file).
After speaking with Chris again, he checked that the folders within my VM were syncing correctly to those in my host machine, and that the SMB connection was adequate. I do not know much about the SMB settings, but some are provided on this link, originally emailed through from Chris. Further reading is available on Vagrant’s page as well. About halfway down the page it illustrates an example vagrantfile, including some port configurations, which I may have to go into as I provision at a later date.
For now though, step complete!

One thought on “Making a vagrant base box work”